2018-6-17 #Java
Java FX
官页 - https://openjfx.io/ 下载页 - https://gluonhq.com/products/javafx/ 文档 - https://openjfx.io/openjfx-docs/#introduction API文档 - https://openjfx.io/javadoc/24/
JavaFX is an open source, next generation client application platform for desktop, mobile and embedded systems built on Java. It is a collaborative effort by many individuals and companies with the goal of producing a modern, efficient, and fully featured toolkit for developing rich client applications.
发展历史
- 2007 年 Sun Microsystems 发布 JavaFX:最初定位为 RIA(富互联网应用)框架,对标 Adobe Flex 和 Microsoft Silverlight。
- JavaFX 1.0(2008):基于 JavaFX Script(一种声明式脚本语言),需独立安装运行环境,与 Java 分离。支持桌面和浏览器插件,但性能较差。
- Oracle 收购 Sun(2010):重新设计 JavaFX,放弃 JavaFX Script,转向纯 Java API。
- JavaFX 8(2014):随 Java 8 发布,成为 JDK 默认组件,无需额外安装。新增 3D 图形、打印 API 和触摸屏支持。
- Java 9+ 与模块化(2017):JavaFX 被拆分为独立模块(
javafx.controls、javafx.graphics等),需通过 OpenJFX 社区维护。 - OpenJFX 项目:Oracle 将 JavaFX 开源,由社区(如 Gluon 公司)主导开发,支持持续更新。
- JavaFX 11(2018):首个完全独立于 JDK 的版本,需手动添加依赖。
JavaFx 模块列表
| javafx.base | Defines the base APIs for the JavaFX UI toolkit, including APIs for bindings, properties, collections, and events. |
| javafx.controls | Defines the UI controls, charts, and skins that are available for the JavaFX UI toolkit. |
| javafx.fxml | Defines the FXML APIs for the JavaFX UI toolkit. |
| javafx.graphics | Defines the core scenegraph APIs for the JavaFX UI toolkit (such as layout containers, application lifecycle, shapes, transformations, canvas, input, painting, image handling, and effects), as well as APIs for animation, css, concurrency, geometry, printing, and windowing. |
| javafx.media | Defines APIs for playback of media and audio content, as part of the JavaFX UI toolkit, including MediaView and MediaPlayer. |
| javafx.swing | Defines APIs for the JavaFX / Swing interop support included with the JavaFX UI toolkit, including SwingNode (for embedding Swing inside a JavaFX application) and JFXPanel (for embedding JavaFX inside a Swing application). |
| javafx.web | Defines APIs for the WebView functionality contained within the the JavaFX UI toolkit. |
Run HelloWorld using Gradle
- 官文档: https://openjfx.io/openjfx-docs/#gradle
- 示例仓库 : https://github.com/openjfx/samples/tree/master/HelloFX/Gradle
build.gradle
build.gradle
plugins {
    id("java")
    id ("application")
    // gradle : javafx插件
    id ("org.openjfx.javafxplugin") version "0.1.0"
}
group = "org.yang.jfx"
version = "1.0-SNAPSHOT"

repositories {
    mavenCentral()
}
// 注意必须配置入口, Gradle 中的Run 是读取这个配置的
application{
    mainClass  = "org.yang.jfx.HelloApplication"
}

javafx {
    version = "17.0.1"
    // 导入 javafx 模块
    modules = listOf("javafx.controls", "javafx-fxml")
}
dependencies {
    //implementation(fileTree("D:\\library\\javafx-sdk-24.0.1\\lib"))
    testImplementation(platform("org.junit:junit-bom:5.10.0"))
}
tasks.test {
    useJUnitPlatform()
}
HelloApplication
HelloApplication
package org.yang.jfx;

import javafx.application.Application;
import javafx.fxml.FXMLLoader;
import javafx.scene.Scene;
import javafx.scene.control.Button;
import javafx.scene.layout.BorderPane;
import javafx.scene.layout.StackPane;
import javafx.stage.Stage;

import java.io.FileOutputStream;
import java.io.IOException;
import java.io.PrintStream;


public class HelloApplication extends Application {

    @Override
    public void start(Stage primaryStage) {
        /**
         * 首先我们创建一个Button,当我们点击Button的时候,改变Button的内容。
         */
        Button btnHello = new Button("Hello");
        /**
         * 设置btnHello按钮点击事件
         */
        btnHello.setOnAction(event->{
            btnHello.setText("Hello World, I am JavaFX!");
        });

        /**
         *  BorderPane是一个用于布局的Pane,BoerderPane将面板分割为上下左右中五部分。
         *  我们可以将UI控件放置在BorderPane的上下左右和中间。
         *  这里将将Button放置在中间。
         */
        BorderPane pane = new BorderPane();
        pane.setCenter(btnHello);

        // 将pane加入到Scen中
        Scene scene = new Scene(pane, 500, 500);

        // 设置stage的scen,然后显示我们的stage
        primaryStage.setScene(scene);
        primaryStage.setTitle("Hello World");
        primaryStage.show();
    }

    public static void main(String[] args) {
        launch(args);

    }

}
注意: 直接在 idea run 是跑不起来的: 错误: 缺少 JavaFX 运行时组件, 需要使用该组件来运行此应用程序 需要在Gradle Task 中的Run才能跑起来!!
Spring boo3 + Javafx
import java.nio.charset.StandardCharsets
import java.io.PrintStream
plugins {
    id ("java")
    id ("application")
    //spring boot
    id("org.springframework.boot") version "3.4.3"
    id("io.spring.dependency-management") version "1.1.7"
    // jlink
    id ("org.beryx.jlink") version "2.26.0"
    id ("org.openjfx.javafxplugin") version "0.1.0"
    id ("com.gluonhq.gluonfx-gradle-plugin") version "1.0.22"
}
group = "org.yang.map.one.step"
version = "1.0.0"

repositories {
    mavenLocal{setUrl("file:///F:\\gradle_local_repository")}  // 优先从本地仓库查找依赖
    maven { setUrl("https://maven.aliyun.com/repository/public") } // 镜像源
    mavenCentral()// 最后查找中央仓库
    mavenCentral()
}

application{
    mainClass  = "org.yang.map.one.step.Main"
    applicationDefaultJvmArgs = listOf(
        // ZGC
        "-XX:+UseZGC",
        // 当遇到空指针异常时显示更详细的信息
        "-XX:+ShowCodeDetailsInExceptionMessages",
        "-Dsun.java2d.opengl=true",
        // 不添加此参数,打包成exe后,https协议的网络图片资源无法加载
        "-Dhttps.protocols=TLSv1.1,TLSv1.2"
    )
}

javafx {
    version = "17.0.1"
    modules = listOf("javafx.controls","javafx.fxml","javafx.web")
}
dependencies {
    //implementation(fileTree("D:\\library\\javafx-sdk-24.0.1\\lib"))
    implementation("cn.hutool:hutool-all:5.8.24")
    //spring boot "3.4.3"
    implementation("org.springframework.boot:spring-boot-starter-web")
    //添加Spring boot3 打包时 Task :createMergedModule 会解析到这两个玩意儿
    implementation("io.micrometer:context-propagation")
    implementation("io.projectreactor.tools:blockhound:1.0.13.RELEASE")

    //slf4j 日志
    implementation("org.slf4j:slf4j-api:2.0.9")
    implementation("ch.qos.logback:logback-classic:1.5.16")
    implementation("ch.qos.logback:logback-core:1.5.16")

    testImplementation(platform("org.junit:junit-bom:5.10.0"))
    implementation(kotlin("stdlib-jdk8"))
}

tasks.withType<JavaCompile> {
    options.encoding = "UTF-8"
}

jlink {
    options.set(listOf("--strip-debug", "--compress", "2", "--no-header-files", "--no-man-pages"))

    launcher {
        name = application.applicationName
        imageName.set(application.applicationName)
    }

    imageZip.set(project.file("${project.layout.buildDirectory.get()}/image-zip/JavaFXSample.zip"))

    jpackage {
        outputDir = "build-package"
        imageName = application.applicationName
        installerType = "exe" // 创建绿色版免安装程序
        skipInstaller = true
        installerName = application.applicationName
        appVersion = version.toString()
        val os = org.gradle.internal.os.OperatingSystem.current()
        if (os.isWindows) {
            icon = "src/main/resources/application.ico"
            installerOptions.addAll(
                listOf("--win-dir-chooser", "--win-menu", "--win-shortcut", "--win-menu-group", application.applicationName)
            )
        }
//        if (os.isMacOsX) {
//            icon = "src/main/resources/application.icns"
//        }
//        if (os.isLinux) {
//            icon = "src/main/resources/application.png"
//            installerType = "deb"
//            installerOptions.addAll(
//                listOf("--linux-deb-maintainer", "icuxika@outlook.com", "--linux-menu-group", application.applicationName, "--linux-shortcut")
//            )
//        }
    }
}

tasks.test {
    useJUnitPlatform()
}

//测试编码问题
tasks.named("createMergedModule") {
    doFirst {
        System.setProperty("file.encoding", "UTF-8")
        val encode = System.getProperty("file.encoding")
        println("== 正在合并模块 (编码: ${encode}) ==")
        System.setOut(PrintStream(System.out, true, StandardCharsets.UTF_8.name()))
        System.setErr(PrintStream(System.err, true, StandardCharsets.UTF_8.name()))
    }
}
module-info
module org.yang.map{
    requires javafx.controls;
    requires javafx.fxml;
    requires javafx.web;
    requires spring.context;
    requires spring.boot;
    requires spring.beans;
    requires spring.boot.autoconfigure;
    requires org.slf4j;
    requires cn.hutool;
    requires java.desktop;

    // 无条件开放整个模块的所有包(反射访问)
    opens org.yang.map.one.step;
}
问题
- 程序包 io.micrometer.context 不存在
E:\projects-my\map-one-step-desktop\build\jlinkbase\tmpjars\org.yang.jfx.merged.module\module-info.java:706: 错误: 程序包io.micrometer.context不存在
    provides io.micrometer.context.ThreadLocalAccessor with io.micrometer.observation.contextpropagation.ObservationThreadLocalAccessor;
                                  ^
E:\projects-my\map-one-step-desktop\build\jlinkbase\tmpjars\org.yang.jfx.merged.module\module-info.java:717: 错误: 程序包reactor.blockhound.integration不存在
    provides reactor.blockhound.integration.BlockHoundIntegration with org.springframework.core.ReactiveAdapterRegistry.SpringCoreBlockHoundIntegration,
添加 Spring boot3 打包时 gradle Task :createMergedModule 合并模块model 会解析到这两个玩意儿
所以需要添加这两个依赖
dependencies {
	//添加Spring boot3 打包时 Task :createMergedModule 会解析到这两个玩意儿
	implementation("io.micrometer:context-propagation")
	implementation("io.projectreactor.tools:blockhound:1.0.13.RELEASE")
	....
[16:53:15.609] �Ҳ��� WiX ���� (light.exe, candle.exe)
[16:53:15.609] �� https://wixtoolset.org ���� WiX 3.0 ����߰汾��Ȼ������ӵ� PATH��
�������� [exe] ��Ч����֧��
with Web 混合开发
build.gradle
.......
javafx {
    version = "17.0.1"
    modules = listOf("javafx.controls","javafx.fxml","javafx.web")//引入 web 模块
}
......
HelloApplication.java
package org.yang.jfx;

import cn.hutool.core.util.RandomUtil;
import cn.hutool.core.util.StrUtil;
import javafx.application.Application;
import javafx.fxml.FXMLLoader;
import javafx.scene.Scene;
import javafx.scene.control.Button;
import javafx.scene.layout.BorderPane;
import javafx.scene.layout.StackPane;
import javafx.scene.web.WebEngine;
import javafx.scene.web.WebView;
import javafx.stage.Stage;
import javafx.scene.image.Image;
import java.io.FileOutputStream;
import java.io.IOException;
import java.io.PrintStream;
import java.net.URI;
import java.net.URISyntaxException;


public class HelloApplication extends Application {

    @Override
    public void start(Stage primaryStage) {

        WebView webView = new WebView();
        WebEngine webEngine = webView.getEngine();
        String externalForm = getClass().getResource("/html/dist/index.html").toExternalForm();
        System.out.println(externalForm);
        webEngine.load(externalForm);

        BorderPane pane = new BorderPane();
        pane.setCenter(webView);

        // 将pane加入到Scen中
        Scene scene = new Scene(pane, 500, 500);
        try {
            URI uri = getClass().getResource("/application.ico").toURI();
            Image appIcon = new Image(uri.toString());
            primaryStage.getIcons().add(appIcon);
        } catch (URISyntaxException e) {
            e.printStackTrace();
        }
        primaryStage.setScene(scene);
        primaryStage.setTitle("Hello World");
        primaryStage.show();
    }

    public static void main(String[] args) {
        launch(args);

    }

}
Transclude of map-one-stop.zip
JavaFX 程序打包
参考项目: https://github.com/JavaFX-Starter/JavaFX-Package-Sample/blob/java21/build.gradle
jlink 插件源码项目 - https://github.com/beryx/badass-jlink-plugin
build.gradle
plugins {
    id ("java")
    id ("application")
    id ("org.beryx.jlink") version "2.26.0"  //  jlink 插件
    id ("org.openjfx.javafxplugin") version "0.1.0"
    // id ("com.gluonhq.gluonfx-gradle-plugin") version "1.0.22"
}
group = "org.yang.jfx"
version = "1.0.0"

javafx {
    version = "17.0.1"
    modules = listOf("javafx.controls","javafx.fxml")
}
dependencies {
    //implementation(fileTree("D:\\library\\javafx-sdk-24.0.1\\lib"))
    testImplementation(platform("org.junit:junit-bom:5.10.0"))
}

tasks.withType<JavaCompile> {
    options.encoding = "UTF-8"
}

application{
    mainClass  = "org.yang.jfx.HelloApplication"
    applicationDefaultJvmArgs = listOf(
        // ZGC
        "-XX:+UseZGC",
        // 当遇到空指针异常时显示更详细的信息
        "-XX:+ShowCodeDetailsInExceptionMessages",
        "-Dsun.java2d.opengl=true",
        // 不添加此参数,打包成exe后,https协议的网络图片资源无法加载
        "-Dhttps.protocols=TLSv1.1,TLSv1.2"
    )
}

jlink {
    options.set(listOf("--strip-debug", "--compress", "2", "--no-header-files", "--no-man-pages"))
    launcher {
        name = application.applicationName
        imageName.set(application.applicationName)
    }

    imageZip.set(project.file("${project.layout.buildDirectory.get()}/image-zip/JavaFXSample.zip"))

    jpackage {
        outputDir = "build-package"//输出目录
        imageName = application.applicationName
        installerType = "exe" // 创建绿色版免安装程序
        skipInstaller = false
        installerName = application.applicationName
        appVersion = version.toString()
        val os = org.gradle.internal.os.OperatingSystem.current()
        if (os.isWindows) {
            icon = "src/main/resources/application.ico"
            installerOptions.addAll(
                listOf("--win-dir-chooser", "--win-menu", "--win-shortcut", "--win-menu-group", application.applicationName)
            )
        }
//        if (os.isMacOsX) {
//            icon = "src/main/resources/application.icns"
//        }
//        if (os.isLinux) {
//            icon = "src/main/resources/application.png"
//            installerType = "deb"
//            installerOptions.addAll(
//                listOf("--linux-deb-maintainer", "icuxika@outlook.com", "--linux-menu-group", application.applicationName, "--linux-shortcut")
//            )
//        }
    }
}

tasks.test {
    useJUnitPlatform()
}
运行 gradle 的 jpackage 任务会在 ./build\build-package\helloJfx 输出打包后的可执行 exe
踩坑指南
IllegalArgumentException
- 关于错误 IllegalArgumentException
java.lang.IllegalArgumentException: "�汾 [1.0-SNAPSHOT] ������Ч��� [0-SNAPSHOT]"
原因 jpackage 对版本号有严格的要求:
- 版本号必须符合 OSGi 版本规范
- 格式应为:
<major>.<minor>.<micro>.<qualifier> - 不允许使用
SNAPSHOT这样的后缀
关于乱码
-
都TM2025还乱码, 关于执行 gradle 任务出现乱码, 但凡项目配置了 UTF-8 基本不是入口的JVM问题.
在
createMergedModule任务 添加前置处理, 打印出来看也是正常
tasks.named("createMergedModule") {
    doFirst {
        System.setProperty("file.encoding", "UTF-8")
        val encode = System.getProperty("file.encoding")
        println("== 正在合并模块 (编码: ${encode}) ==")
        System.setOut(PrintStream(System.out, true, StandardCharsets.UTF_8.name()))
        System.setErr(PrintStream(System.err, true, StandardCharsets.UTF_8.name()))
    }
}
-
核心原因是 createMergedModule 任务中, 又启动了JVM或者其他进程中处理 使用的编码不对, 导致报错时输出主控制台乱码!!
-
如何调试? 再使用IDEA控制台带
--stacktrace参数再跑一遍, 拿到执行任务的错误栈, 分析
createMergedModule --stacktrace
看源码gradle的大部分任务应该是封装为 org.gradle.process.internal.DefaultExecAction 对象处理
public class DefaultExecAction extends DefaultExecHandleBuilder implements ExecAction {
    public DefaultExecAction(PathToFileResolver fileResolver, Executor executor, BuildCancellationToken buildCancellationToken) {
        super(fileResolver, executor, buildCancellationToken);
    }

    @Override
    public ExecResult execute() {
        ExecHandle execHandle = build();
        ExecResult execResult = execHandle.start().waitForFinish();  //执行
        if (!isIgnoreExitValue()) {
            execResult.assertNormalExitValue();
        }
        return execResult;
    }
}
主逻辑在 org.gradle.process.internal.DefaultExecHandle#start
@Override
public ExecHandle start() {
    LOGGER.info("Starting process '{}'. Working directory: {} Command: {} {}",
            displayName, directory, command, ARGUMENT_JOINER.join(arguments));
    lock.lock();
    try {
        if (!stateIn(ExecHandleState.INIT)) {
            throw new IllegalStateException(format("Cannot start process '%s' because it has already been started", displayName));
        }
        setState(ExecHandleState.STARTING);

        broadcast.getSource().beforeExecutionStarted(this);
        execHandleRunner = new ExecHandleRunner(
            this, new CompositeStreamsHandler(), processLauncher, executor, CurrentBuildOperationRef.instance().get()
        );
        executor.execute(execHandleRunner);

        while (stateIn(ExecHandleState.STARTING)) {
            LOGGER.debug("Waiting until process started: {}.", displayName);
            try {
                stateChanged.await();
            } catch (InterruptedException e) {
                execHandleRunner.abortProcess();
                throw UncheckedException.throwAsUncheckedException(e);
            }
        }

        if (execResult != null) {
            execResult.rethrowFailure();
        }

        LOGGER.info("Successfully started process '{}'", displayName);
    } finally {
        lock.unlock();
    }
    return this;
}
最终执行在 org.gradle.process.internal.ExecHandleRunner#startProcess 又新开了一个进程
private void startProcess() {
    lock.lock();
    try {
        if (aborted) {
            throw new IllegalStateException("Process has already been aborted");
        }
        ProcessBuilder processBuilder = processBuilderFactory.createProcessBuilder(execHandle);
        Process process = processLauncher.start(processBuilder);
        streamsHandler.connectStreams(process, execHandle.getDisplayName(), executor);
        this.process = process;
    } finally {
        lock.unlock();
    }
}
jpackageImage FAILED
The module name specified in 'application.mainModule' (null) has not the expected value (org.yang.map).
在 application 块, 增加 mainModule 属性
application{
	// 解决
    mainModule = "org.yang.map"

}
Scene Builder
JavaFx 的场景设计器, (终于单独出来, 不依赖eclipse了)
https://docs.gluonhq.com/#scenebuilder-LibraryManager 下载页: https://gluonhq.com/products/scene-builder/
For JDK 8
Scene Builder for eclipse plugin
- eclipse 首先需要安装 e(fx)eclipse
参考 JavaFX Tooling and Runtime for Eclipse and OSGi
- 打开eclipse →
help -> install software - work with 选择:
Oxygen - http://download.eclipse.org/releases/oxygen - 过滤输入
e(fx)clipse - 选上
e(fx)clipse - IDENext . accept.. finish
-
Oracle [javafx Scene Builder download page]
下载对应平台安装, 例:javafx_scenebuilder-1_1-windows.msi -
配置Eclipse以使用Scene Builder
-
Window -> References -> JavaFX -
找到 Scene Builder executeable 的执行文件目录即可
如果不安装, JDK1.8 (1.9以后又给去掉) 集成了javafx, 直接到
./jre/lib/ext/jfxrt.jar把这个包, copy过来就行..
第一个JavaFX Project
- 它已经自动生成一些文件
HelloJFx
    └─src
        └─application
                application.css
                Main.java
新建fxml
新建./src/application.fxml ui文件** open with Scene Builder设计
<!> 第一个容器需要拖动到左下(分层结构|Document) 才有效=.= {Builder 2.0不用了}
设计界面
- 左上, 一些预定义的容器,组件..
- 左下, 设置预览与java代码交互的配置,例设置controller, action 方法
- 右边,组件的风格,配置..
设计后的xml文件.
    <?xml version="1.0" encoding="UTF-8"?>

    <?import java.lang.*?>
    <?import javafx.scene.control.*?>
    <?import javafx.scene.layout.*?>
    <?import javafx.scene.layout.AnchorPane?>

    <!-- fx:controller 属性指定控制类, 代码后面-->
    <AnchorPane xmlns:fx="http://javafx.com/fxml/1" xmlns="http://javafx.com/javafx/2.2" fx:controller="application.Controller">

    <children>
        <Pane layoutX="0.0" layoutY="0.0" minHeight="300.0" minWidth="400.0" prefHeight="200.0" prefWidth="200.0">
        <children>
            <!-- Button 组件: fx:id="myButton" 指定ID; onAction="#sayHolle" 指定事件方法 -->
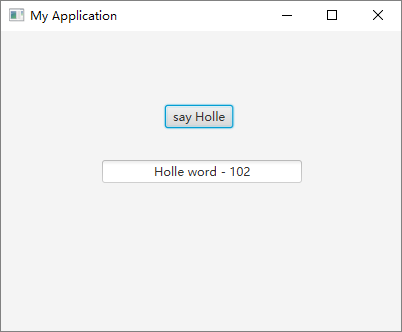
            <Button fx:id="myButton" layoutX="164.0" layoutY="74.0" mnemonicParsing="false" onAction="#sayHolle" text="say Holle" />
            <!-- TextField 组件:两个ID区别
            1. fx:id, 主要应用于java代码 查找,控制引用;
            2. id, 主要应用于css样式选择器 例如: #myButton{ font-size: 16pt; }-->
            <TextField id="myButton" fx:id="myTextField" alignment="TOP_CENTER" editable="false" layoutX="101.0" layoutY="129.0" prefWidth="200.0" text="----" />
        </children>
        </Pane>
    </children>
    </AnchorPane>
控制器代码, application.Controller
package application;

import java.net.URL;
import java.util.ResourceBundle;

import javafx.event.ActionEvent;
import javafx.fxml.FXML;
import javafx.fxml.Initializable;
import javafx.scene.control.Button;
import javafx.scene.control.TextField;

public class Controller implements Initializable {

	@FXML
	private Button myButton;
	@FXML
	private TextField myTextField;

	private int count = 0;
	@Override
	public void initialize(URL location, ResourceBundle resources) {

    /**
    这里初始化每个控件.
    fxml设置最基本的容器;
    然后在这里为容器添加 自定义组件等等..

    */
		System.out.println("Controller initialize");
		count = 100;
	}

	public void sayHolle(ActionEvent event) {
		myTextField.setText("Holle word - "+ count++);

	}
}
Main方法
package application;

import javafx.application.Application;
import javafx.fxml.FXMLLoader;
import javafx.scene.Parent;
import javafx.scene.Scene;
import javafx.stage.Stage;


public class Main extends Application {
	@Override
	public void start(Stage primaryStage) {
		try {
			 Parent root = FXMLLoader.load(getClass()
	                    .getResource("/application.fxml"));

            primaryStage.setTitle("My Application");
            primaryStage.setScene(new Scene(root));
			primaryStage.show();
		} catch(Exception e) {
			e.printStackTrace();
		}
	}

	public static void main(String[] args) {
		launch(args);
	}
}
概念
Application
javafx.application.Application
javafx.application.Application 是javafx程序的入口点, 每个javaFX应用都需要继承javafx.application.Application 类, 他已经定义了应用程序的生命周期, 包含一下方法(这些方法都会被javafx框架自动调用):
Application.init() 在应用开始之前做一些准备; 这个方法在 JavaFX launcher 这个特殊的线程中调用;
Application.start(Stage stage) 用来开启程序, 可以用来定义完整的应用程序和通过添加一个场景定义应用程序的主窗口视图;
Application.stop() 在应用关闭的时候被调用一次, 它可以由不同原因触发, 比如用户点击了程序主窗口的退出按钮; 这个方法被JavaFX应用程序线程调用;
Stage Scene
Stage(舞台)是一个类似于Swing中的JWindow的顶级容器, 代表一个窗口;
它用于容纳场景Scene, 场景Scene是一个类似于Swing的JFrame的容器; 但是却是以树的形式组织的, 每一个子组件就是它的一个节点;
其根节点一般是Pane面板如以上的: StackPane.它是一个根节点容器; 可以容纳子节点; 各子节点挂载在其上;
https://blog.csdn.net/xby1993/article/details/17203977 https://hjk685.iteye.com/blog/2202279
与swing混用
在JavaFX中, 有个JFXPanel; 这个组件是JavaFX和Swing进行混合编程的桥梁;
JFXPanel是继承于JComponent的; 而JavaFX的UI控件都是继承于javafx.scene.control.Control; 所以很明显, 它其实是一个Swing组件, 而非JavaFX的组件;
继承关系基本相同, 也就是说, 凡是在使用JPanel的地方, 我们都可以用JFXPanel来替代; JFXPanel中有一个setScene方法, 可以设置其中显示的JavaFX内容;
//JFXPanel 继承链
java.lang.Object
  java.awt.Component
    java.awt.Container
      javax.swing.JComponent
        javafx.embed.swing.JFXPanel
// JPanel 继承链
java.lang.Object
  继承者 java.awt.Component
      继承者 java.awt.Container
          继承者 javax.swing.JComponent
              继承者 javax.swing.JPanel
嵌入swing组件
@Override
public void initialize(URL arg0, ResourceBundle arg1) {
	  final SwingNode swingNode = new SwingNode();
	createAndSetSwingContent(swingNode);
  //在初始化时添加 swingNode
	javafxComp.getChildren().add(swingNode);
}

  private void createAndSetSwingContent(final SwingNode swingNode) {
    SwingUtilities.invokeLater(new Runnable() {
    @Override
    public void run() {
      JPanel panel = new JPanel();
      panel.add(new Player() );
      swingNode.setContent(panel);
    }
    });
  }