2016-12-31
Git
GUI Clients Downloads git 命令文档 一个在线学习的网站
配置管理
用法
git config
usage: git config [<options>]
Config file location
    --global              use global config file
    --system              use system config file
    --local               use repository config file
    --worktree            use per-worktree config file
    -f, --file <file>     use given config file
    --blob <blob-id>      read config from given blob object
Action
    --get                 get value: name [value-pattern]
    --get-all             get all values: key [value-pattern]
    --get-regexp          get values for regexp: name-regex [value-pattern]
    --get-urlmatch        get value specific for the URL: section[.var] URL
    --replace-all         replace all matching variables: name value [value-pattern]
    --add                 add a new variable: name value
    --unset               remove a variable: name [value-pattern]
    --unset-all           remove all matches: name [value-pattern]
    --rename-section      rename section: old-name new-name
    --remove-section      remove a section: name
    -l, --list            list all
    --fixed-value         use string equality when comparing values to 'value-pattern'
    -e, --edit            open an editor
    --get-color           find the color configured: slot [default]
    --get-colorbool       find the color setting: slot [stdout-is-tty]
Type
    -t, --type <>         value is given this type
    --bool                value is "true" or "false"
    --int                 value is decimal number
    --bool-or-int         value is --bool or --int
    --bool-or-str         value is --bool or string
    --path                value is a path (file or directory name)
    --expiry-date         value is an expiry date
Other
    -z, --null            terminate values with NUL byte
    --name-only           show variable names only
    --includes            respect include directives on lookup
    --show-origin         show origin of config (file, standard input, blob, command line)
    --show-scope          show scope of config (worktree, local, global, system, command)
    --default <value>     with --get, use default value when missing entry
配置用户信息
# 设置全局用户名和邮箱
git config --global user.name "yang"
git config --global user.email "fish58bf@gmail.com"

# 查看当前配置
git config --list
可以使用
git config --list命令查看已配置的参数
配置代理
# HTTP代理
git config --global http.proxy http://127.0.0.1:10808
git config --global https.proxy https://127.0.0.1:10808

# SOCKS5代理
git config --global http.proxy socks5://127.0.0.1:1080
git config --global https.proxy socks5://127.0.0.1:1080

# 取消代理设置
git config --global --unset http.proxy
git config --global --unset https.proxy
配置冲突处理工具
可以设置 git 默认冲突解决工具, 就不用每次都输入
$ git config merge.tool meld
$ git config merge.conflictstyle diff3
$ git config mergetool.prompt false

# 设置颜色显示
git config --global color.ui auto
版本库初始化
https://git-scm.com/docs/git-init
git init [-q | --quiet] [--bare] [--template=<template_directory>]
          [--separate-git-dir <git dir>] [--object-format=<format>]
          [-b <branch-name> | --initial-branch=<branch-name>]
          [--shared[=<permissions>]] [directory]
git-init - Create an empty Git repository or reinitialize an existing one
这个命令创建一个空的 Git 仓库 - 基本上是一个包含对象、refs/heads、refs/tags 子目录和模板文件的 .git 目录。将会创建一个没有任何提交的初始分支(查看下面的 --initial-branch 选项以了解其名称)。
This command creates an empty Git repository - basically a
.gitdirectory with subdirectories for objects,refs/heads,refs/tags, and template files. An initial branch without any commits will be created (see the--initial-branchoption below for its name).
如果设置了 $GIT_DIR 环境变量,它将指定一个路径,而不是使用 ./.git 作为仓库的基础路径。
If the $GIT_DIR environment variable is set then it specifies a path to use instead of ./.git for the base of the repository.
如果通过 $GIT_OBJECT_DIRECTORY 环境变量指定了对象存储目录,那么SHA-1目录将在其下创建,否则将使用默认的 $GIT_DIR/objects 目录。
If the object storage directory is specified via the GIT_DIR/objects directory is used.
在现有的存储库中运行 git init 是安全的。它不会覆盖已经存在的内容。重新运行 git init 的主要原因是为了获取新添加的模板(或者在给定 --separate-git-dir 选项的情况下,将存储库移到另一个位置)。
Running git init in an existing repository is safe. It will not overwrite things that are already there. The primary reason for rerunning git init is to pick up newly added templates (or to move the repository to another place if —separate-git-dir is given).
# 创建新仓库
git init my-project
cd my-project

# 初始化指定目录
git init /path/to/project

# 创建裸仓库(服务器端)
git init --bare my-project.git
暂存区(index)
添加文件
usage: git add [<options>] [--] <pathspec>...
    -n, --dry-run         dry run
    -v, --verbose         be verbose
    -i, --interactive     interactive picking
    -p, --patch           select hunks interactively
    -e, --edit            edit current diff and apply
    -f, --force           allow adding otherwise ignored files
    -u, --update          update tracked files
    --renormalize         renormalize EOL of tracked files (implies -u)
    -N, --intent-to-add   record only the fact that the path will be added later
    -A, --all             add changes from all tracked and untracked files
    --ignore-removal      ignore paths removed in the working tree (same as --no-all)
    --refresh             don't add, only refresh the index
    --ignore-errors       just skip files which cannot be added because of errors
    --ignore-missing      check if - even missing - files are ignored in dry run
    --sparse              allow updating entries outside of the sparse-checkout cone
    --chmod (+|-)x        override the executable bit of the listed files
    --pathspec-from-file <file> read pathspec from file
    --pathspec-file-nul   with --pathspec-from-file, pathspec elements are separated with NUL character
git add [FileName]
git add -u * 仅添加修改了的文件
git add -f 强制添加, 忽略 .gitignore 配置文件
移除文件
git rm [FileName]
移动文件
git mv file_from file_to
查看跟踪状态
git status
Changes to be committed:
  (use "git restore --staged <file>..." to unstage)
        deleted:    src/main/java/cc/agentx/client/net/nio/game/Holder.java
Changes not staged for commit:
  (use "git add <file>..." to update what will be committed)
  (use "git restore <file>..." to discard changes in working directory)
        modified:   config.json
        modified:   pom.xml
Untracked files:
  (use "git add <file>..." to include in what will be committed)
        .classpath
        .project
        agentx.iml
Untracked files 没有被跟踪的文件
Changes to be committed 在暂存区; 更改的文件会被提交
Changes not staged for commit 已追踪更改, 但未添加到暂存区的文件, 可git add 添加 (in short 在工作区中)
取消跟踪
同时下次提交时从本地仓库删除
git rm --cached [文件名]
git rm -r -n --cached WebRoot/WEB-INF/classes/*-n 加上这个参数, 不会删除任何文件, 而是显示将删除文件列表预览.
git rm -r -cached WebRoot/WEB-INF/classes/*最终执行.
重置暂存区
如果你想完全取消暂存区中的所有更改,可以使用 git reset 命令。
git reset
比较工作目录和暂存区
git diff 命令来比较工作目录中的文件和暂存区中的文件之间的差异。
从版本库替换工作区版本
用法: git checkout <commit> -- path/to/file
git checkout -- [文件名] //默认最新提交
如果你想恢复整个工作目录中的所有文件到特定版本(比如最新提交)
git checkout HEAD .
提交 (commit)
提交注释规范
比如Angular团队的提交规范 被广泛使用,其格式如下:
<type>(<scope>): <subject>

<body>

<footer>
各部分说明:
-
<type>
表示提交的类型,常见类型包括:feat:新增功能(feature)fix:修复问题(bug fix)docs:仅修改文档(documentation)style:代码格式调整(不影响功能,如空格、分号等)refactor:重构代码(既不添加功能也不修复 bug)test:添加或修改测试代码chore:构建过程或辅助工具的更改(如依赖更新)revert:回滚到之前的版本
-
<scope>
可选字段,表示提交影响的范围(模块或文件),例如login,api,ui等。 -
<subject>
简短描述提交内容,不超过 50 个字符,以小写字母开头,句末不加标点。 -
<body>
可选字段,详细描述提交内容,换行时每行不超过 72 个字符。 -
<footer>
可选字段,用于注明 Breaking Changes 或关联的 Issue/PR 编号,例如:
示例
| 类型 | 描述 | 示例 |
|---|---|---|
| feat | 提交新功能或新增特性 | feat: 增加用户注册功能 |
| fix | 修复已知问题或 Bug | fix: 修复登录页面崩溃的问题 |
| docs | 修改文档内容(不影响代码逻辑) | docs: 更新README文件 |
| style | 代码风格调整(如格式化、缩进、注释等),不影响代码逻辑 | style: 删除多余的空行 |
| refactor | 代码重构(不涉及新增功能或修复 Bug) | refactor: 重构用户验证逻辑 |
| perf | 性能优化 | perf: 优化图片加载速度 |
| test | 添加或修改测试代码 | test: 增加用户模块的单元测试 |
| chore | 构建工具、依赖管理或其他辅助工具的变更(不影响生产代码) | chore: 更新依赖库 |
| build | 构建系统或外部依赖项的变更 | build: 升级webpack到版本5 |
| ci | 持续集成配置的变更 | ci: 修改GitHub Actions配置文件 |
| revert | 回滚之前的提交 | revert: 回滚feat: 增加用户注册功能 |
提交暂存区记录
git commit -m '提交说明' -m 参数添加提交说明
git commit -a -m '提交说明' 加 -a 参数 可以跳过暂存区, 直接提交被跟踪文件的最新版本;
查看提交历史 log
git log
所有分支历史
git log --all
用 ASCII 符号图形化表示分支合并历史
git log --all --graph
查看某文件修改历史 blame
git blame {FileName}
git blame用来追溯一个指定文件的历史修改记录。它能显示任何文件中每行最后一次修改的提交记录
修改最后一次提交(仅没有push过)
git commit --amend
# 直接指定新注释
git commit --amend -m "新的提交信息"
git commit --amend并不是直接“编辑”了原来的提交,而是创建了一个全新的提交,并用这个新提交替换了旧的提交。因此,这次提交的哈希ID(commit ID)会发生改变,其后的所有提交(如果存在)的哈希ID也可能随之改变,这相当于改写了项目历史
删除最近一个提交
git reset HEAD~1
其实就是把HEAD指针指向 回退1
版本回退 reset
git reset --hard [HEAD^ | {commitID}]
—hard 参数
指定切换版本可以是 commitID
也可以用HEAD表示相对版本,上一个版本就是HEAD^,上上一个版本就是HEAD^^,当然往上100个版本写100个^比较容易数不过来,所以写成HEAD~100。
git reset –-mixed [commitID] or [HEAD ^指针]
不带提交ID 或HEAD 参数, 默认恢复上一次提交
–mixed此为默认方式, 它回退到某个版本, 回退commit和index(暂存区)信息
–soft只回退了commit的信息, 不会回退index信息(暂存区)
–hard彻底回退到某个版本, 本地的源码也会变为该版本的内容
例:
git reset --hard 彻底恢复到上一个版本 包括本地
git reset 不带参数使用它可以清空暂存区
版本前进 reflog
版本回退了, 想在回去怎么办? 需要找之前的 commit Id
Git提供了一个命令git reflog用来记录你的每一次命令:
$ git reflog
91668ca (HEAD -> master) HEAD@{0}: commit (merge): merged from main
c821954 HEAD@{1}: commit: m22
f694ddb HEAD@{2}: checkout: moving from dev to master
2f074be HEAD@{3}: commit: 22
f694ddb HEAD@{4}: checkout: moving from master to dev
f694ddb HEAD@{5}: commit (initial): 主分支提交
git reset --hard 2f074be
归档 git-archive
git-archive - Create an archive of files from a named tree
用法: git archive --format=zip --output=archive.zip main
导出特定分支的内容
git archive --format=zip --output=archive.zip main
这个命令将 main 分支的内容导出到名为 archive.zip 的 ZIP 存档文件中
导出某个提交的内容
git archive --format=zip --output "./output.zip" 5ca16ac0d603603
导出特定文件的内容
git archive --format=zip --output=archive.zip main path/to/file.txt
本地
放弃修改文件
放弃本地所有文件修改可以使用 git checkout . 命令
恢复删除文件
-
删除, 若未修改本地仓库 (未提交)
git checkout -- fileName即可恢复 -
git rm 删除从本地版本库记录中删除该文件.
git reset HEAD fileName;再之后checkout 出来 -
文件已删除且已推送至远程仓库,这时只能通过历史记录恢复
找到这个文件的最近的修改记录
git log [-p fileName]
然后恢复
git checkout commit_id -- fileName
只有 .git 文件夹, 如何恢复?
cd repo.git

# 创建budele文件
git bundle create ./reponame.bundle --all

# 从bundle文件中clone出代码
git clone ./reponame.bundle reponame
# 这时文件夹内会出现一个 reponame 文件夹,这个文件夹内就是所有的代码文件

# 并且还可以恢复其他分支的代码
git clone -b release ./reponame.bundle reponame

# 新建新的git仓库 名为 newrepo
git remote rm origin
# url.git 为新的git仓库地址
git remote add origin newrepo.git
stash 功能
Git还提供了一个 stash 功能, 可以把当前工作现场”储藏”起来, 等以后恢复现场后继续工作
usage: git stash [push [-p|--patch] [-k|--[no-]keep-index] [-q|--quiet]
                 [-u|--include-untracked] [-a|--all] [-m|--message <message>]
                 [--] [<pathspec>...]]

    -k, --keep-index      keep index
    -p, --patch           stash in patch mode
    -q, --quiet           quiet mode
    -u, --include-untracked
                          include untracked files in stash
    -a, --all             include ignore files
    -m, --message <message>
                          stash message
    --pathspec-from-file <file>
                          read pathspec from file
    --pathspec-file-nul   with --pathspec-from-file, pathspec elements are separated with NUL character
stash 保存
//保存状态
git stash <!> 注意保存的是在工作区的文件, 如果有跟踪的文件修改了不在工作区则会报错: error: Entry ‘myplayer.cpp’ not uptodate. Cannot merge. Cannot save the current worktree state
stash 列表查看
查看stash 已保存的列表
git stash liststash 恢复
一是用git stash apply stash@{0}恢复, 但是恢复后, stash内容并不删除, 你需要用git stash drop来删除;
另一种方式是用 git stash pop, 恢复的同时把stash内容也删了
git stash popgit stash apply stash@{0}.gitignore 文件忽略
在git中如果想忽略掉某个文件, 不让这个文件提交到版本库中, 可以使用修改根目录中 .gitignore 文件的方法; 这个文件每一行保存了一个匹配的规则 例如:
# 此为注释 – 将被 Git 忽略

*.sample  # 忽略所有 .sample 结尾的文件
!lib.sample  # 但 lib.sample 除外
/TODO  # 仅仅忽略项目根目录下的 TODO 文件, 不包括 subdir/TODO
build/  # 忽略 build/ 目录下的所有文件
doc/*.txt # 会忽略 doc/notes.txt 但不包括 doc/server/arch.txt
.gitignore 规则不生效?
原因是 .gitignore 只能忽略那些原来没有被追踪的文件, 如果某些文件已经被纳入了版本管理中, 则修改 .gitignore 是无效的;
那么解决方法就是先把本地缓存删除(改变成未被追踪状态), 然后再提交
git rm -r --cached .
git add .
git commit -m 'update .gitignore'
有时候忽略规则可能忽略掉想添加的文件, 可以是使用: git check-ignore -v App.class 检查
分支管理 branch
查看分支
git branch 命令查看当前分支
git branch -a 全部分支(包含本地和远程)
$ git branch
* dev
  master
当前分支前面会标一个*号。
切换分支
git checkout [BranchName]
git checkout master
Switched to branch 'master'
_在 Git 2.23 版本中,引入了一个名为 git switch 因为 checkout 作为单个命令有点超载(它承载了很多独立的功能)。
git switch [<options>] [--no-guess] <branch>
git switch [<options>] --detach [<start-point>]
git switch [<options>] (-c|-C) <new-branch> [<start-point>]
git switch [<options>] --orphan <new-branch>
新建分支
git branch [BranchName]
git checkout -b dev : checkout 命令加上-b 参数表示创建并切换,相当于以下两条命令
$ git branch dev
$ git checkout dev
Switched to branch 'dev'
删除分支
git branch -d [被删除的分支]
合并分支
git merge 命令用于合并指定分支到当前分支 (以当前分支为主);
usage: git merge [<options>] [<commit>...]
   or: git merge --abort
   or: git merge --continue
git merge origin/master
冲突管理
$ git merge dev
Auto-merging test.txt
CONFLICT (content): Merge conflict in test.txt
Automatic merge failed; fix conflicts and then commit the result.
自动合并失败, dev 分支也修改了 test.txt 文件
冲突文件说明
此时 test.txt 文件;
 <<<<<<< HEAD
1111111111111222
=======
22221111111111111
 >>>>>>> dev
<<<<<<< HEAD到=======表示本分支 HEAD修改的内容;=======到>>>>>>> dev表示本被合并的分支修改的内容;
冲突处理工具
执行: git mergetool
This message is displayed because ‘merge.tool’ is not configured.
See ‘git mergetool —tool-help’ or ‘git help config’ for more details.
‘git mergetool’ will now attempt to use one of the following tools: opendiff kdiff3 tkdiff xxdiff meld tortoisemerge gvimdiff diffuse diffmerge ecmerge p4merge araxis bc codecompare smerge emerge vimdiff nvimdiff Merging: test.txt
会生成各个分支的文件, 再键入: meld 打开GUI工具
冲突处理完成
执行以下命令提交到 Git
git commit -m "merged from dev"
最后
- 还有个
test.txt.orig文件, 它是由 mergetool 创建的, 运行命令会将其删除:git clean -f - 执行:
git branch -d dev删除dev 分支
配置默认冲突解决工具
可以设置git 默认冲突解决工具, 就不用每次都输入
$ git config merge.tool meld
$ git config merge.conflictstyle diff3
$ git config mergetool.prompt false
合并远程分支的代码?
-
先获取最新数据
git fetch --all -
本地创建一个与新分支并且关联远程分支
git checkout -b dev origin/master -
切换回本地的 master 版本
git checkout master -
将本地的 dev 合并到 master
git merge dev -
删除dev 分支
git branch -d dev
私有服务端
for git
安装 git
sudo apt-get install git创建git用户
创建一个git 伪用户, 仅用来运行git服务
useradd git -d -r -s /usr/sbin/nologin 出于安全考虑,第二步创建的git用户不允许登录shell,这可以通过编辑/etc/passwd文件完成。
创建证书登录
收集所有需要登录的用户的公钥,就是他们自己的id_rsa.pub文件,把所有公钥导入到/home/git/.ssh/authorized_keys文件里,一行一个。
vi /home/git/.ssh/authorized_keys
ssh-rsa AAAAB3NzaC1yc2EAAAADAQABAAABgQDxxxxxxxxxxxxxxxxxxxxxxxxxxxxxxxxxxxxxDX+2cn4mwxERp8sWGmGM5tJvQO58= fish58bf@gmail.com
如果团队很小,把每个人的公钥收集起来放到服务器的/home/git/.ssh/authorized_keys文件里就是可行的。如果团队有几百号人,就没法这么玩了,这时,可以用Gitosis来管理公钥。
Gitlab
GitLab 是一个用于仓库管理系统的开源项目,使用Git作为代码管理工具,并在此基础上搭建起来的Web服务。
远程仓库
配置SSL证书
- 先在客户端, 配置用户信息
配置全局用户名:
git config --global user.name "yourname"
配置登陆email: 远程连接时需要输入密码的:
git config --global user.email "fish58bf@gmail.com"
- 生成ssh key
ssh-keygen -t rsa -C "fish58bf@gmail.com"
中间可键入私钥密码, 作为保密手段 私钥位置为
系统用户主目录/.ssh/xxx,有pub后缀则为公钥
- github网页端, 添加公钥.
网页登陆git → Settings → SSH and GPG keys → New SSH keys → 复制公钥内容粘贴 → add ssh key
- git客户端, ssh连接:
ssh -T git@github.com
添加仓库
git remote add [shortname] [url]
[http]协议不能作为git的远程仓库添加
推(push)
git push [remote-name] [branch-name]
git push git@gitlab.com:agri_puppy/chat_agriculture.git master
本地 reset 过如何解决
git reset --hard 回退了本地提交,但远程仓库已经有更新
如果你 确定远程的新提交不重要(比如是你自己误操作推上去的,且没有其他人依赖),你可以强制推送:
git push --force-with-lease origin master
这会 覆盖远程历史
拉(fetch)
git fetch [remote-name]
git fetch —all # 拉取项目更新
克隆
git clone [url]
查看远程仓库
git remote -v
重命名仓库
git remote rename
移除仓库
git remote rm
linux 是如何使用私/公钥?
把私/公钥复制 ~/.ssh/ 目录下即可 :) , 注意公钥文件后缀一般是.pub
杂项
查看工作区和最新版本的差异 diff
git diff HEAD -- readme.txt
比较两个版本的 src 文件夹差异 diff
git diff 版本号码1 版本号码2 src
git blame
git blame用来追溯一个指定文件的历史修改记录
git blame 文件名
归档 archive
>git archive
usage: git archive [<options>] <tree-ish> [<path>...]
   or: git archive --list
   or: git archive --remote <repo> [--exec <cmd>] [<options>] <tree-ish> [<path>...]
   or: git archive --remote <repo> [--exec <cmd>] --list

    --format <fmt>        archive format
    --prefix <prefix>     prepend prefix to each pathname in the archive
    --add-file <file>     add untracked file to archive
    --add-virtual-file <path:content>
                          add untracked file to archive
    -o, --output <file>   write the archive to this file
    --worktree-attributes
                          read .gitattributes in working directory
    -v, --verbose         report archived files on stderr
    -NUM                  set compression level

    -l, --list            list supported archive formats

    --remote <repo>       retrieve the archive from remote repository <repo>
    --exec <command>      path to the remote git-upload-archive command
git archive -o latest.zip HEAD打包最新的提交
git archive -o latest.zip [提交ID]打包某个提交
git archive -o partial.zip HEAD src doc只将目录src和doc建立到归档文件partial.tar中
参考资料
大部分常用可参考: https://git-scm.com/book/zh/v1/Git-%E5%88%86%E6%94%AF-%E4%BD%95%E8%B0%93%E5%88%86%E6%94%AF
http://www.open-open.com/lib/view/open1328069733264.html
http://www.runoob.com/git/git-basic-operations.html
老是记错的概念问题
-
Git 主要关注文件的那些内容? Git 和其他版本控制系统的主要差别在于, Git 只关心文件数据的整体是否发生变化, 而大多数其他系统则只关心文件内容的具体差异
-
一个提交(commit)对象 都有什么?
(1)该对象包含一个指向暂存内容快照的指针 (2)包含本次提交的作者等相关附属信息 (3)包含零个或多个指向该提交对象的父对象指针
(4)首次提交是没有直接祖先的, 普通提交有一个祖先, 由两个或多个分支合并产生的提交则有多个祖先; -
什么是HEAD? HEAD 约等于最后一个提交的指针(它总是指向当前版本); 合并分支时会有两个问题(快进以及分支冲突);
-
index区; 又叫暂存区, 又叫缓存区, 又叫index区
git add把文件添加进去,实际上就是把文件修改添加到暂存区;git commit提交更改,实际上就是把暂存区的所有内容提交到当前分支 -
工作区 工作区是指开发者在本地计算机上的工作目录, 文件;
好用的工具
好用的GUI管理工具
gitkraken gitkraken(管理私有仓库收费)
SourceTree SourceTree
好用的Chrome扩展
https://chrome.google.com/webstore/detail/octotree-github-code-tree/bkhaagjahfmjljalopjnoealnfndnagc 挺好用的一个 Chrome插件 Octotree, 以树形的方式展示 github 的项目
个人 Git配置
以ubuntu示例
-
服务端安装git
sudo apt-get install git -
初始化空仓库
git init --bare myrepository.git
这样初始化的仓库并没有.git目录, 只有.git目录下的文件; 把它复制到服务器, 例如
/home/yang/myrepository.git
- git的ssh仓库, 登陆验证, 本质上是ssh登陆
使用系统用户目录下的.ssh/id_rsa密钥文件登陆.
服务端配置ssh的公钥[authorized_keys]文件验证.
如果某个 SSH 用户对该目录有写权限, 那他就有推送权限;
为了安全可以另建立一个用户组, 独立文件夹权限配置, 禁止shell登陆,像配置ftp一样.
证书配置可参考, 参考另一篇笔记: N_Linux [open-ssh的配置 ]
-
测试
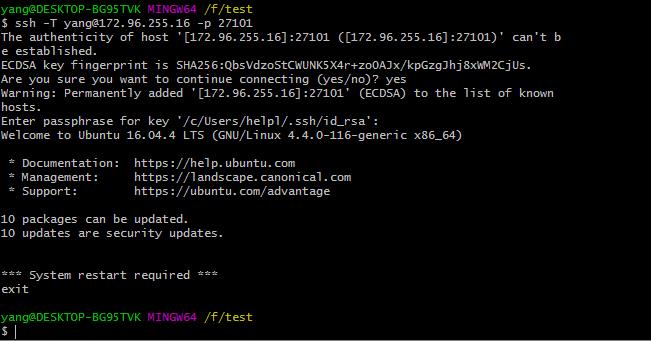
ssh -T yang@172.96.255.16 -p 27101-p 指定端口
如图:
-
接下来就是相当于一个远程仓库了
克隆
git clone ssh://yang@172.96.255.16:27101/home/yang/myrepository.git
添加远程仓库
$ git remote add myrepository ssh://yang@172.96.255.16:27101/home/yang/myrepository.git
推
git push myrepository master
参考: 仓库与远程